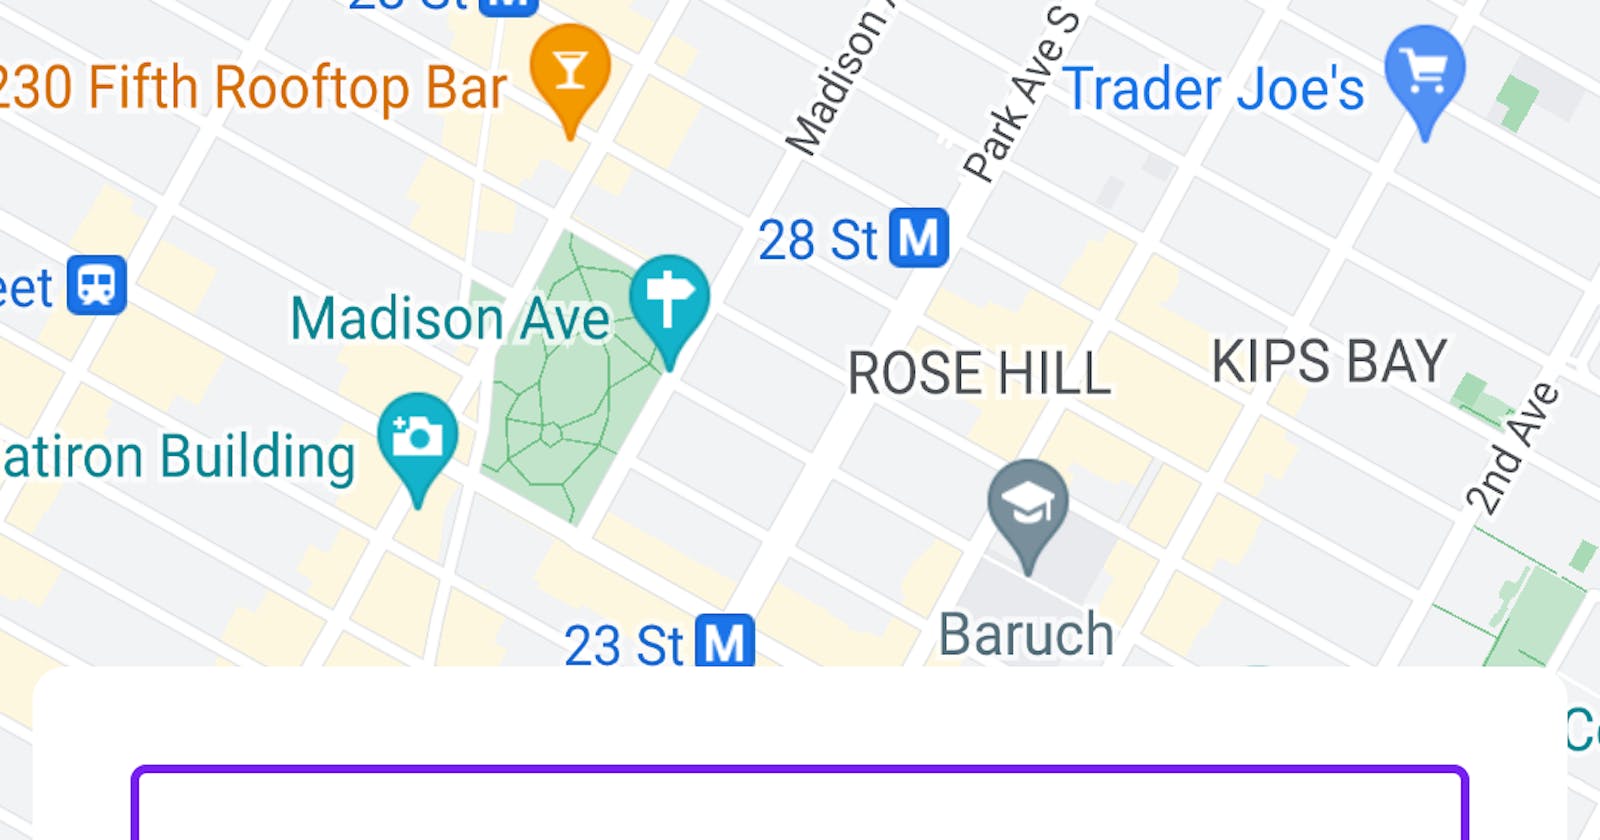
Integrating Google Maps, Places API, and Reverse Geocoding with Jetpack Compose
Integrating Google maps into Android apps has been somewhat of a tough nut to crack for developers. With the advent of Jetpack Compose for building native UI on Android, the Google Maps team announced a Map SDK for Compose, available here. However, it is only a piece of the puzzle.
The SDK helps with drawing the map on the screen and gives you a very featureful GoogleMap composable with tons of customization, but if you are looking to build a full-fledged address selection screen akin to Ola, Uber, or Swiggy, you may need to integrate several APIs in addition to this.
The two most important are:
Places API, used to facilitate autocomplete and provide details for a place on the map.
Geocoding API, used to convert between lat-long coordinates and the textual address for a point.
Let's walk through their implementation.
Our Goal
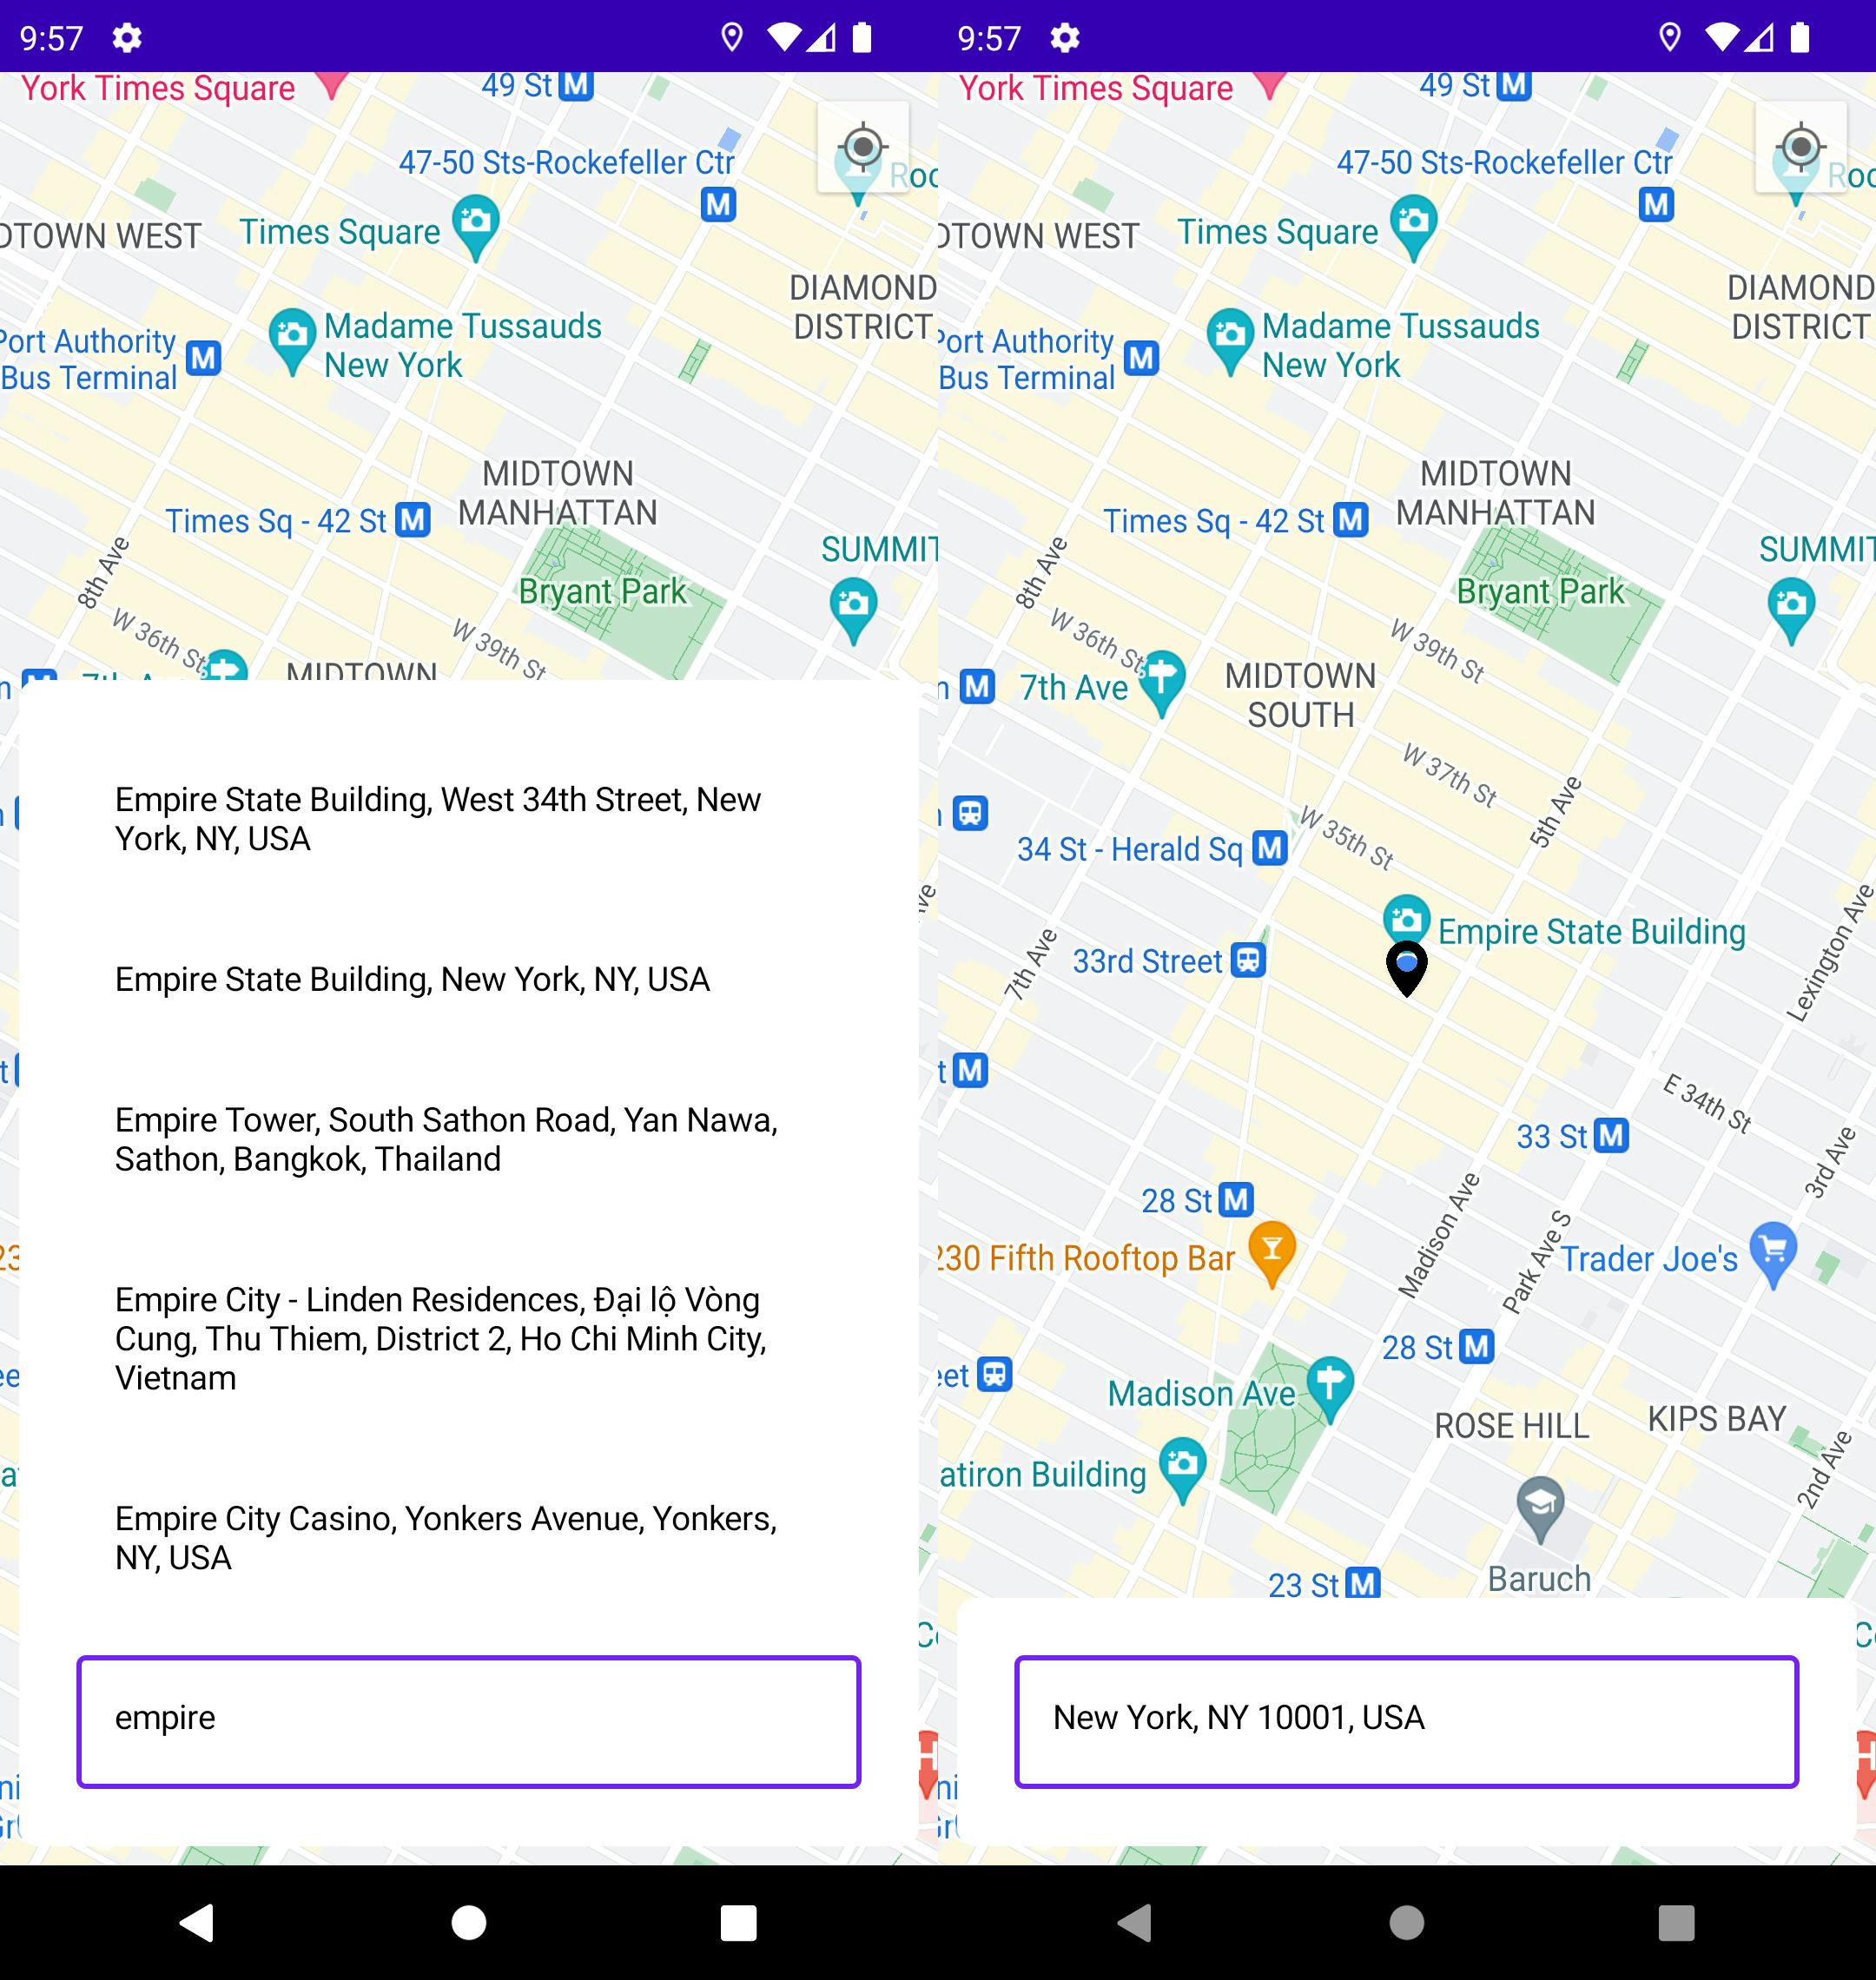
We will build a Map screen where users can select their current location. They can do so either by moving the marker to their desired location or by searching for a place in the TextField. The finished screen will look like this:
Let's get started.
1. Google Maps Platform
To use the Google Maps platform, you must create a Google Cloud project, link it to a billing account, and enable the Google Maps SDK for Android.
At the time of writing, Google Maps provides all projects with $200 credit that recurs monthly. That means that you likely won't be paying anything until you have a lot of users. Your billing account will only be charged if you spend more than $200 in a month.
To do so, follow these steps:
Create a Google Cloud Project and/or enable Maps SDK for Android, Places API, and Geocoding API. Extensive instructions and direct links are available here
Obtain an API key by following the instructions here. This API key will be used to authenticate your app with the Google Maps service.
It's recommended to restrict the API key to your app by following the instructions in the doc. This prevents misuse of your API key if it's leaked.
Set up your app to use the Google Maps platform, and specify the API key in the manifest. Instructions here.
By now, you should've added your API key to your
local.propertiesnameMAPS_API_KEY. We'll need the key later for interacting with the Places API, so create a buildConfigField for it. In your app-levelbuild.gradle, add the following code inside thedefaultConfigblock:Properties properties = new Properties() if (rootProject.file("local.properties").exists()) { properties.load( rootProject .file("local.properties") .newDataInputStream() ) } buildConfigField( "String", "MAPS_API_KEY", properties.getProperty("MAPS_API_KEY") )This will create a new BuildConfig field from the key that you have defined in your
local.propertiesfile, which can be used anywhere in the app by referencingBuildConfig.MAPS_API_KEY.
2. GoogleMap Composable
To display a Google Map in your Compose-based Android app, you can use the SDK for compose. It wraps an AndroidView under the hood and gives you several good abstractions that'll help you write idiomatic Compose code. Instructions on integrating the SDK are provided via the README of the project.
We want our map to initially be focused on the user's current location. To obtain the current location, we'll need
ACCESS_FINE_LOCATIONpermissionLocation enabled in the settings
To represent all these states, we can construct a sealed class:
sealed class LocationState {
    object NoPermission: LocationState()
    object LocationDisabled: LocationState()
    object LocationLoading: LocationState()
    data class LocationAvailable(val location: LatLng): LocationState()
    object Error: LocationState()
}
This is an extremely simplified version. A production app will have more complex state interactions.
Now, we'll build our ViewModel for the screen, which will act as the state holder, containing an instance of the above-defined sealed class. It'll also be responsible for fetching and updating the current location. To do so, we'll use the FusedLocationProviderClient. You can read more about it here. Currently, our ViewModel looks like this:
class LocationViewModel : ViewModel() {
    lateinit var fusedLocationClient: FusedLocationProviderClient

    var locationState by mutableStateOf<LocationState>(LocationState.NoPermission)

    @SuppressLint("MissingPermission")
    fun getCurrentLocation() {
        locationState = LocationState.LocationLoading
        fusedLocationClient
            .getCurrentLocation(Priority.PRIORITY_HIGH_ACCURACY, null)
            .addOnSuccessListener { location ->
                locationState = if (location == null && locationState !is LocationState.LocationAvailable) {
                    LocationState.Error
                } else {
                    LocationState.LocationAvailable(LatLng(location.latitude, location.longitude))
                }
            }
    }
}
Note that the fusedLocationClient is a lateinit object, so we'll need to instantiate it in the fragment's onCreate:
override fun onCreate(savedInstanceState: Bundle?) {
    super.onCreate(savedInstanceState)

    viewModel.fusedLocationClient = LocationServices.getFusedLocationProviderClient(requireActivity())
}
Now, let's define a couple of self-explanatory utility functions in the fragment (they can also be made extension functions or stored separately in a util file with the activity being an argument):
private fun requestLocationEnable() {
    activity?.let {
        val locationRequest = LocationRequest.create()
        val builder = LocationSettingsRequest
            .Builder()
            .addLocationRequest(locationRequest)
        val task = LocationServices
            .getSettingsClient(it)
            .checkLocationSettings(builder.build())
            .addOnSuccessListener {
                if (it.locationSettingsStates?.isLocationPresent == true) {
                    viewModel.getCurrentLocation()
                }
            }
            .addOnFailureListener {
                if (it is ResolvableApiException) {
                    try {
                        it.startResolutionForResult(requireActivity(), 999)
                    } catch (e : IntentSender.SendIntentException) {
                        e.printStackTrace()
                    }
                }
            }

    }
}

private fun locationEnabled(): Boolean {
    val locationManager = requireActivity().getSystemService(Context.LOCATION_SERVICE) as LocationManager
    return LocationManagerCompat.isLocationEnabled(locationManager)
}
With our states and utility methods defined, we finally move to our composable. We can use the Permissions Library from the Accompanist collection to request location permission.
val locationPermissionState = rememberMultiplePermissionsState(
    listOf(
        Manifest.permission.ACCESS_COARSE_LOCATION,
        Manifest.permission.ACCESS_FINE_LOCATION
    )
)
Then we can add a LaunchedEffect to update the state when the permission state changes. If they are granted, we check for the location is enabled, and if that's also enabled, we ask the ViewModel to get the current location.
LaunchedEffect(locationPermissionState.allPermissionsGranted) {
    if (locationPermissionState.allPermissionsGranted) {
        if (locationEnabled()) {
            viewModel.getCurrentLocation()
        } else {
            viewModel.locationState = LocationState.LocationDisabled
        }
    }
}
Lastly, we define what UI will be rendered on basis of the location state:
AnimatedContent(
    viewModel.locationState
) { state ->
    when (state) {
        is LocationState.NoPermission -> {
            Column {
                Text("We need location permission to continue")
                Button(onClick = { locationPermissionState.launchMultiplePermissionRequest() }) {
                    Text("Request permission")
                }
            }
        }
        is LocationState.LocationDisabled -> {
            Column {
                Text("We need location to continue")
                Button(onClick = { requestLocationEnable() }) {
                    Text("Enable location")
                }
            }
        }
        is LocationState.LocationLoading -> {
            Text("Loading Map")
        }
        is LocationState.Error -> {
            Column {
                Text("Error fetching your location")
                Button(onClick = { viewModel.getCurrentLocation() }) {
                    Text("Retry")
                }
            }
        }
        is LocationState.LocationAvailable -> {
            val cameraPositionState = rememberCameraPositionState {
                position = CameraPosition.fromLatLngZoom(state.location, 15f)
            }
            val mapUiSettings by remember { mutableStateOf(MapUiSettings()) }
            val mapProperties by remember { mutableStateOf(MapProperties(isMyLocationEnabled = true)) }

            GoogleMap(
                modifier = Modifier.fillMaxSize(),
                cameraPositionState = cameraPositionState,
                uiSettings = mapUiSettings,
                properties = mapProperties
            )
        }
    }
}
In the GoogleMap composable, we can see that it fills the entire screen and takes a Camera Position State, which is responsible for what the user sees on the screen. In our code, the position is set to the user's location that's been obtained through the fusedLocationProvider. It also takes a MapUiSettings object, where you can tweak the visibility of elements like zoom buttons and my location button. Additionally, in MapProperties you can define attributes like the map type, style, and whether the user location is enabled.
Our complete fragment looks like this at the moment:
class LocationFragment : Fragment() {

    private val viewModel by viewModels<LocationViewModel>()

    override fun onCreateView(
        inflater: LayoutInflater,
        container: ViewGroup?,
        savedInstanceState: Bundle?
    ): View? {
        return ComposeView(requireContext()).apply {
            setViewCompositionStrategy(ViewCompositionStrategy.DisposeOnViewTreeLifecycleDestroyed)
            setContent {
                LocationScreen()
            }
        }
    }

    override fun onCreate(savedInstanceState: Bundle?) {
        super.onCreate(savedInstanceState)

        viewModel.fusedLocationClient = LocationServices.getFusedLocationProviderClient(requireActivity())
    }

    @OptIn(ExperimentalPermissionsApi::class, ExperimentalAnimationApi::class)
    @Composable
    fun LocationScreen(modifier: Modifier = Modifier) {
        val locationPermissionState = rememberMultiplePermissionsState(
            listOf(
                Manifest.permission.ACCESS_COARSE_LOCATION,
                Manifest.permission.ACCESS_FINE_LOCATION
            )
        )

        LaunchedEffect(locationPermissionState.allPermissionsGranted) {
            if (locationPermissionState.allPermissionsGranted) {
                if (locationEnabled()) {
                    viewModel.getCurrentLocation()
                } else {
                    viewModel.locationState = LocationState.LocationDisabled
                }
            }
        }

        AnimatedContent(
            viewModel.locationState
        ) { state ->
            when (state) {
                is LocationState.NoPermission -> {
                    Column {
                        Text("We need location permission to continue")
                        Button(onClick = { locationPermissionState.launchMultiplePermissionRequest() }) {
                            Text("Request permission")
                        }
                    }
                }
                is LocationState.LocationDisabled -> {
                    Column {
                        Text("We need location to continue")
                        Button(onClick = { requestLocationEnable() }) {
                            Text("Enable location")
                        }
                    }
                }
                is LocationState.LocationLoading -> {
                    Text("Loading Map")
                }
                is LocationState.Error -> {
                    Column {
                        Text("Error fetching your location")
                        Button(onClick = { viewModel.getCurrentLocation() }) {
                            Text("Retry")
                        }
                    }
                }
                is LocationState.LocationAvailable -> {
                    val cameraPositionState = rememberCameraPositionState {
                        position = CameraPosition.fromLatLngZoom(state.location, 15f)
                    }
                    val mapUiSettings by remember { mutableStateOf(MapUiSettings()) }
                    val mapProperties by remember { mutableStateOf(MapProperties(isMyLocationEnabled = true)) }

                    GoogleMap(
                        modifier = Modifier.fillMaxSize(),
                        cameraPositionState = cameraPositionState,
                        uiSettings = mapUiSettings,
                        properties = mapProperties
                    )
                }
            }
        }
    }

    private fun locationEnabled(): Boolean {
        val locationManager = requireActivity().getSystemService(Context.LOCATION_SERVICE) as LocationManager
        return LocationManagerCompat.isLocationEnabled(locationManager)
    }

    private fun requestLocationEnable() {
        activity?.let {
            val locationRequest = LocationRequest.create()
            val builder = LocationSettingsRequest
                .Builder()
                .addLocationRequest(locationRequest)
            val task = LocationServices
                .getSettingsClient(it)
                .checkLocationSettings(builder.build())
                .addOnSuccessListener {
                    if (it.locationSettingsStates?.isLocationPresent == true) {
                        viewModel.getCurrentLocation()
                    }
                }
                .addOnFailureListener {
                    if (it is ResolvableApiException) {
                        try {
                            it.startResolutionForResult(requireActivity(), 999)
                        } catch (e : IntentSender.SendIntentException) {
                            e.printStackTrace()
                        }
                    }
                }

        }
    }
}
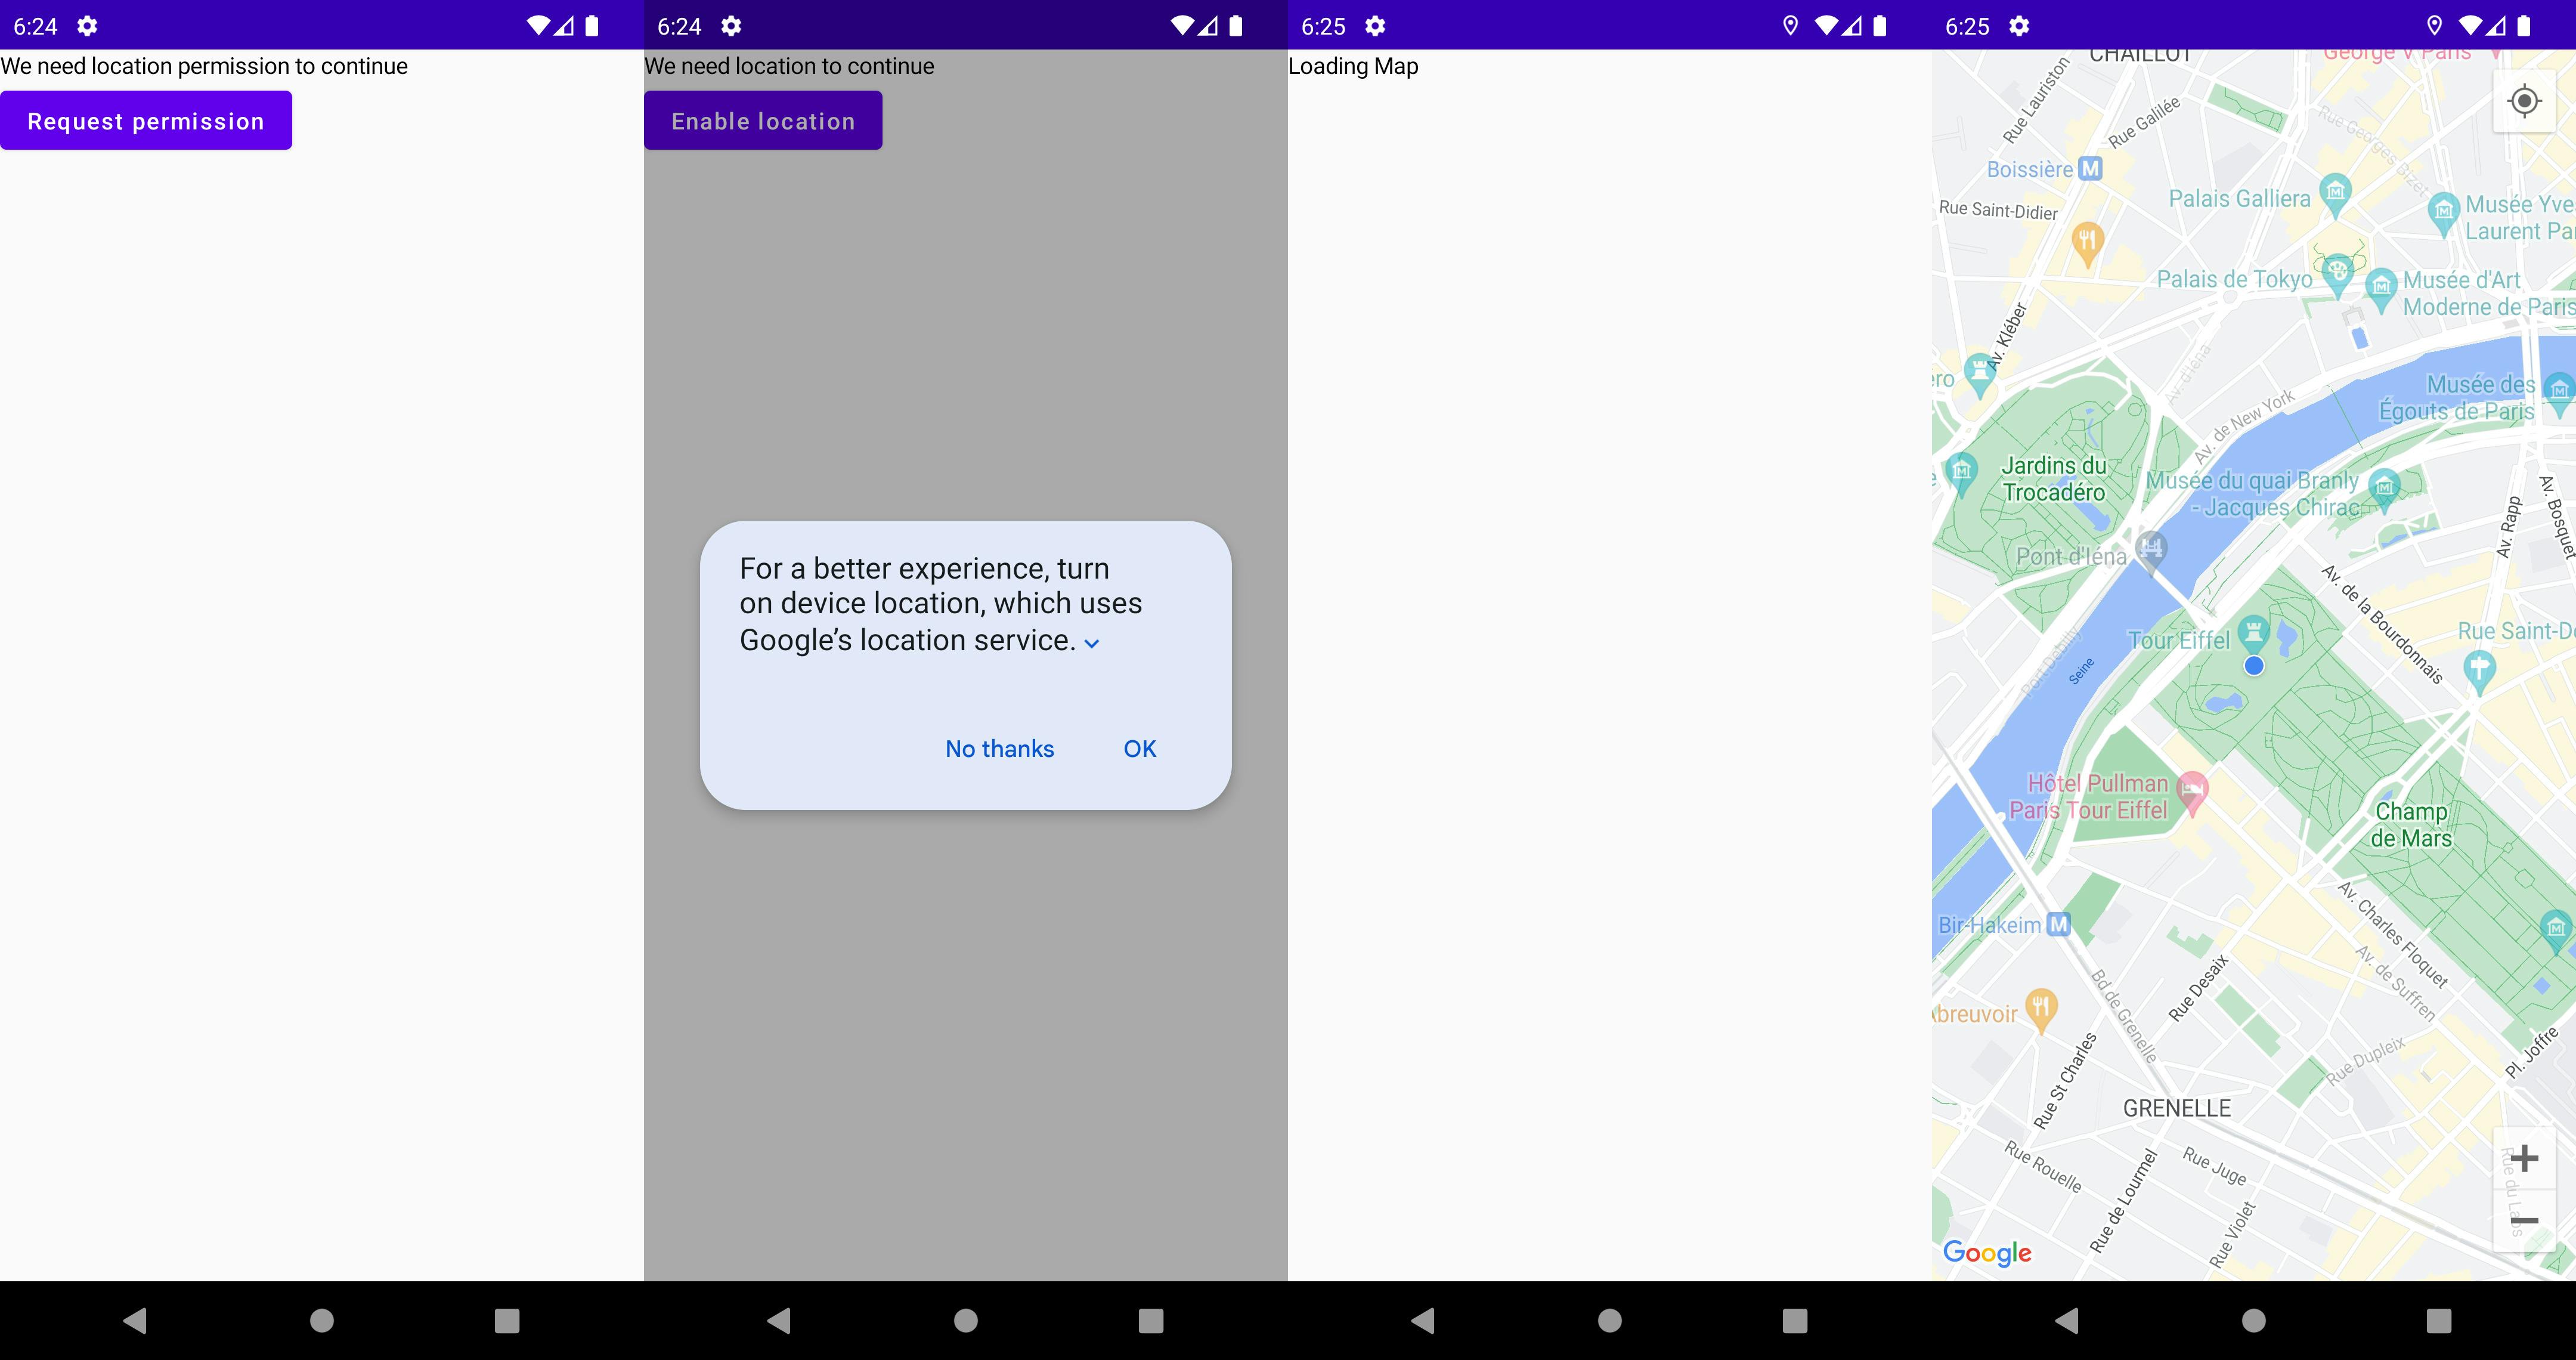
And our app looks like this:
Let's add a marker
The GoogleMap composable has a content parameter, so we can pass it more composables that it'll render on the surface. One such Composable is Marker. Here's how you can use it:
GoogleMap(
    modifier = Modifier.fillMaxSize(),
    cameraPositionState = cameraPositionState,
    uiSettings = mapUiSettings,
    properties = mapProperties
) {
    Marker(
        state = rememberMarkerState(position = state.location)
    )
}
This code emits a marker that's always centered on the map since it uses the map's camera position to derive its own position. The user can move the map to center the marker anywhere they'd like. You can also add attributes like title, snippets and even configure onClick behavior.
3. Places API
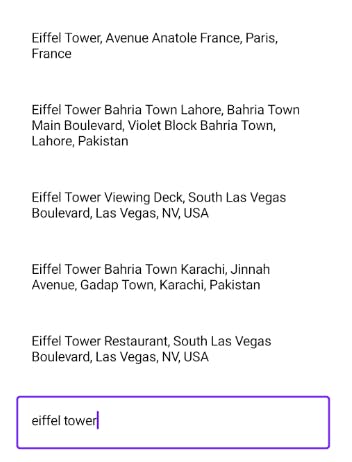
We use the Places API to provide autocomplete in textfields. Our intention is to achieve UI like this:
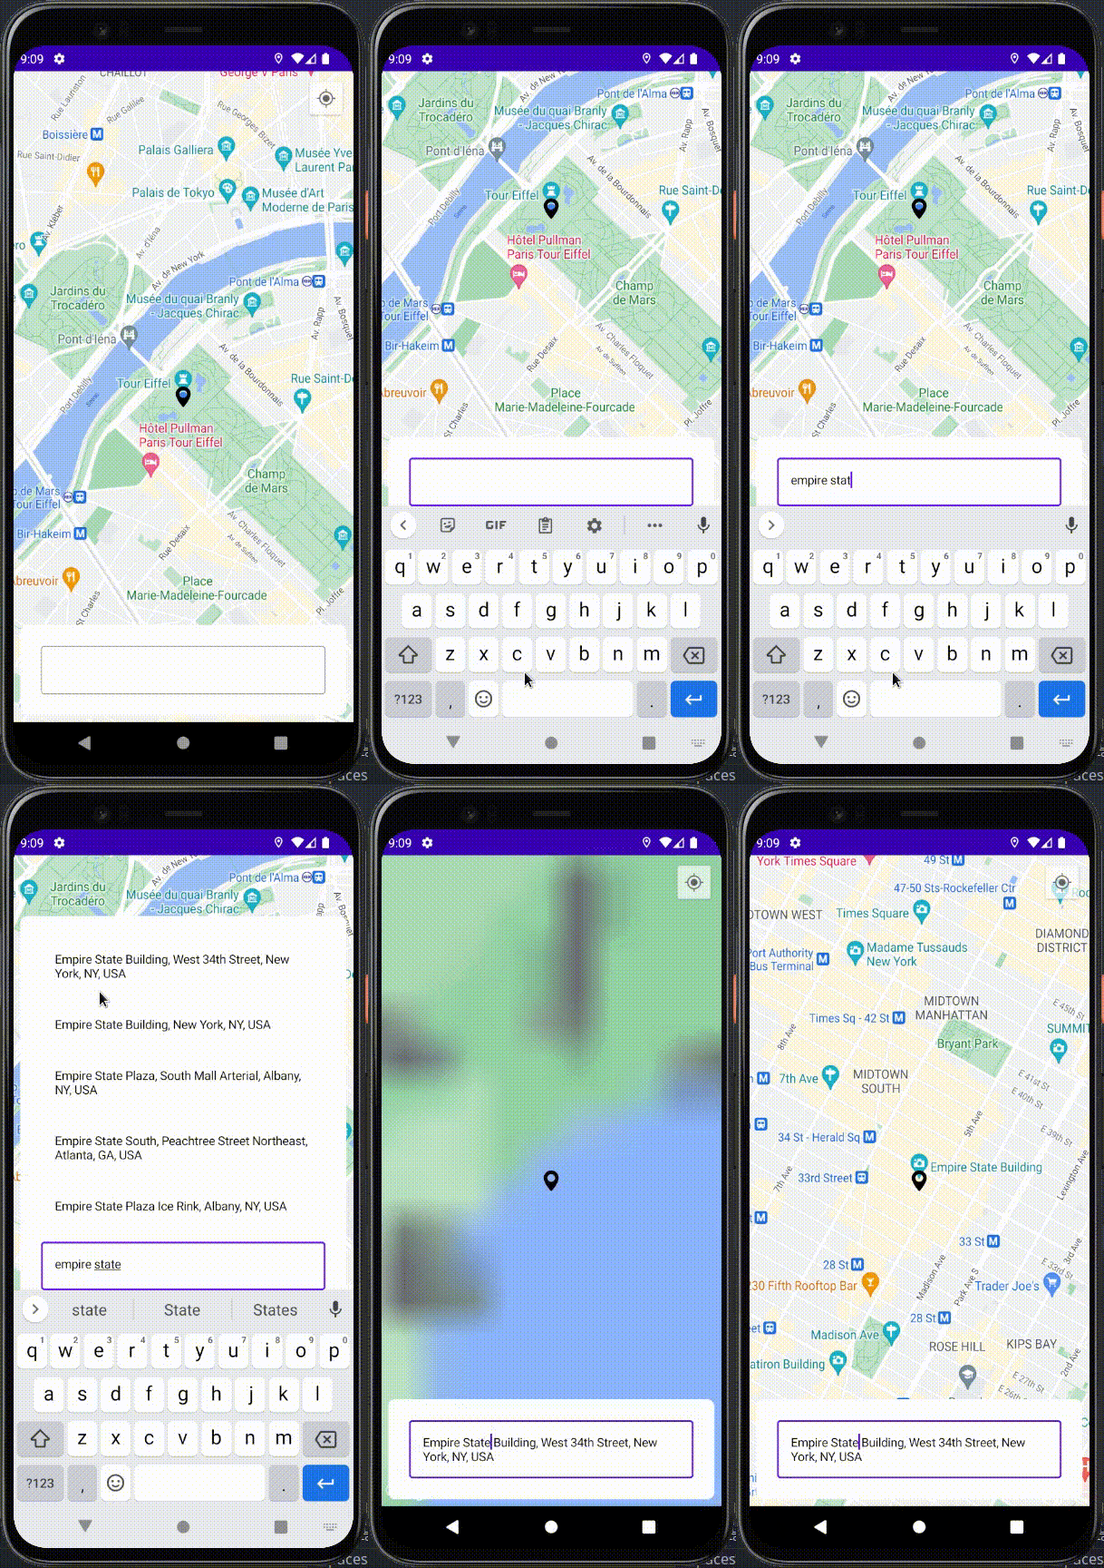
Here, the user can search for any place and select a result from the autocomplete. Upon selection, the map moves to the place as well.
Prerequisites:
To use the places API, first ensure it's enabled in the Google Cloud Console.
Afterward, add this library to your app-level build.gradle:
dependencies {
    implementation 'com.google.android.libraries.places:places:3.0.0'
}
That's it, we're now ready to use the Places API.
It's time to add a TextField to our composable so that the user can search for places. We can add one to the bottom of the map using a Box. See the code below:
Box(
    modifier = Modifier.fillMaxSize()
) {
    GoogleMap(
        modifier = Modifier.fillMaxSize(),
        cameraPositionState = cameraPositionState,
        uiSettings = mapUiSettings,
        properties = mapProperties,
        onMapClick = {
            scope.launch {
                cameraPositionState.animate(CameraUpdateFactory.newLatLng(it))
            }
        }
    )

    Surface(
        modifier = Modifier
            .align(Alignment.BottomCenter)
            .padding(8.dp)
            .fillMaxWidth(),
        color = Color.White,
        shape = RoundedCornerShape(8.dp)
    ) {
        Column(
            modifier = Modifier
                .padding(16.dp),
            horizontalAlignment = Alignment.CenterHorizontally
        ) {
            var text by remember { mutableStateOf("") }

            AnimatedVisibility(
                viewModel.locationAutofill.isNotEmpty(),
                modifier = Modifier
                    .fillMaxWidth()
                    .padding(8.dp)
            ) {
                LazyColumn(
                    verticalArrangement = Arrangement.spacedBy(8.dp)
                ) {
                    items(viewModel.locationAutofill) {
                        Row(
                            modifier = Modifier
                                .fillMaxWidth()
                                .padding(16.dp)
                                .clickWithRipple {
                                    text = it.address
                                    viewModel.locationAutofill.clear()
                                    viewModel.getCoordinates(it)
                                }
                        ) {
                            Text(it.address)
                        }
                    }
                }
                Spacer(Modifier.height(16.dp))
            }
            OutlinedTextField(
                value = text,
                onValueChange = {
                    text = it
                    viewModel.searchPlaces(it)
                },
                modifier = Modifier
                    .fillMaxWidth()
                    .padding(8.dp)
            )
        }
    }
}
We add a surface towards the bottom of the map, and use a column to position a textfield. There's a LazyColumn above that which appears when there are autofill results.
To handle places autocomplete results, we construct a data class. It contains a full address and a place ID, which we can use to obtain the lat-long for the place.
data class AutocompleteResult(
    val address: String,
    val placeId: String
)
Then, we use a SnapshotStateList, which is a state-aware list that'll store any autofill results that are made available via the search.
val locationAutofill = mutableStateListOf<AutocompleteResult>()
Now, whenever the user inputs a query, the searchPlaces method in the ViewModel is called:
private var job: Job? = null

fun searchPlaces(query: String) {
    job?.cancel()
    locationAutofill.clear()
    job = viewModelScope.launch {
        val request = FindAutocompletePredictionsRequest
            .builder()
            .setQuery(query)
            .build()
        placesClient
            .findAutocompletePredictions(request)
            .addOnSuccessListener { response ->
                locationAutofill += response.autocompletePredictions.map {
                    AutocompleteResult(
                        it.getFullText(null).toString(),
                        it.placeId
                    )
                }
            }
            .addOnFailureListener {
                it.printStackTrace()
                println(it.cause)
                println(it.message)
            }
    }
}
Notice the use of a CoroutineJob to handle debouncing. Since this method is called every time the user inputs a new character in the field, it can be called quite often, resulting in numerous expensive searches. To reduce the amount, we perform the whole operation inside a Coroutine, which is canceled whenever the method is called. This ensures that the method is called only for the last input character.
The API has several filters like country, location, and radius available which you can use to optimize your results.
When autocomplete results are available, the SnapshotStateList is updated with them, and the changes are immediately reflected in the UI. Now, to handle movement to the place on which the user has clicked, we define a new state object called currentLatLang.
var currentLatLong by mutableStateOf(LatLng(0.0, 0.0))
In our composable, we have a LaunchedEffect that's triggered everytime this state updates. It executes a camera movement:
LaunchedEffect(viewModel.currentLatLong) {
    cameraPositionState.animate(CameraUpdateFactory.newLatLng(viewModel.currentLatLong))
}
Now, to update this state object, we call the getCoordinates method. Remember, in our autocomplete results, we have a place ID, not coordinates. To get the lat-long for a place ID, we can use this code:
fun getCoordinates(result: AutocompleteResult) {
        val placeFields = listOf(Place.Field.LAT_LNG)
        val request = FetchPlaceRequest.newInstance(result.placeId, placeFields)
        placesClient.fetchPlace(request)
            .addOnSuccessListener {
                if (it != null) {
                    currentLatLong = it.place.latLng!!
                }
            }
            .addOnFailureListener {
                it.printStackTrace()
            }
    }
So, as soon as the user selects an autocomplete result in the UI, this method is called and executes an update in the map's camera position. We have successfully implemented the Places Autocomplete API and integrated it with our GoogleMap. yay!
4. Reverse Geocoding API
Now we need to handle the last use-case where the address in the textfield should update whenever the marker is moved. To do this, we use the process of Reverse Geocoding, where we convert lat-long coordinates to an address.
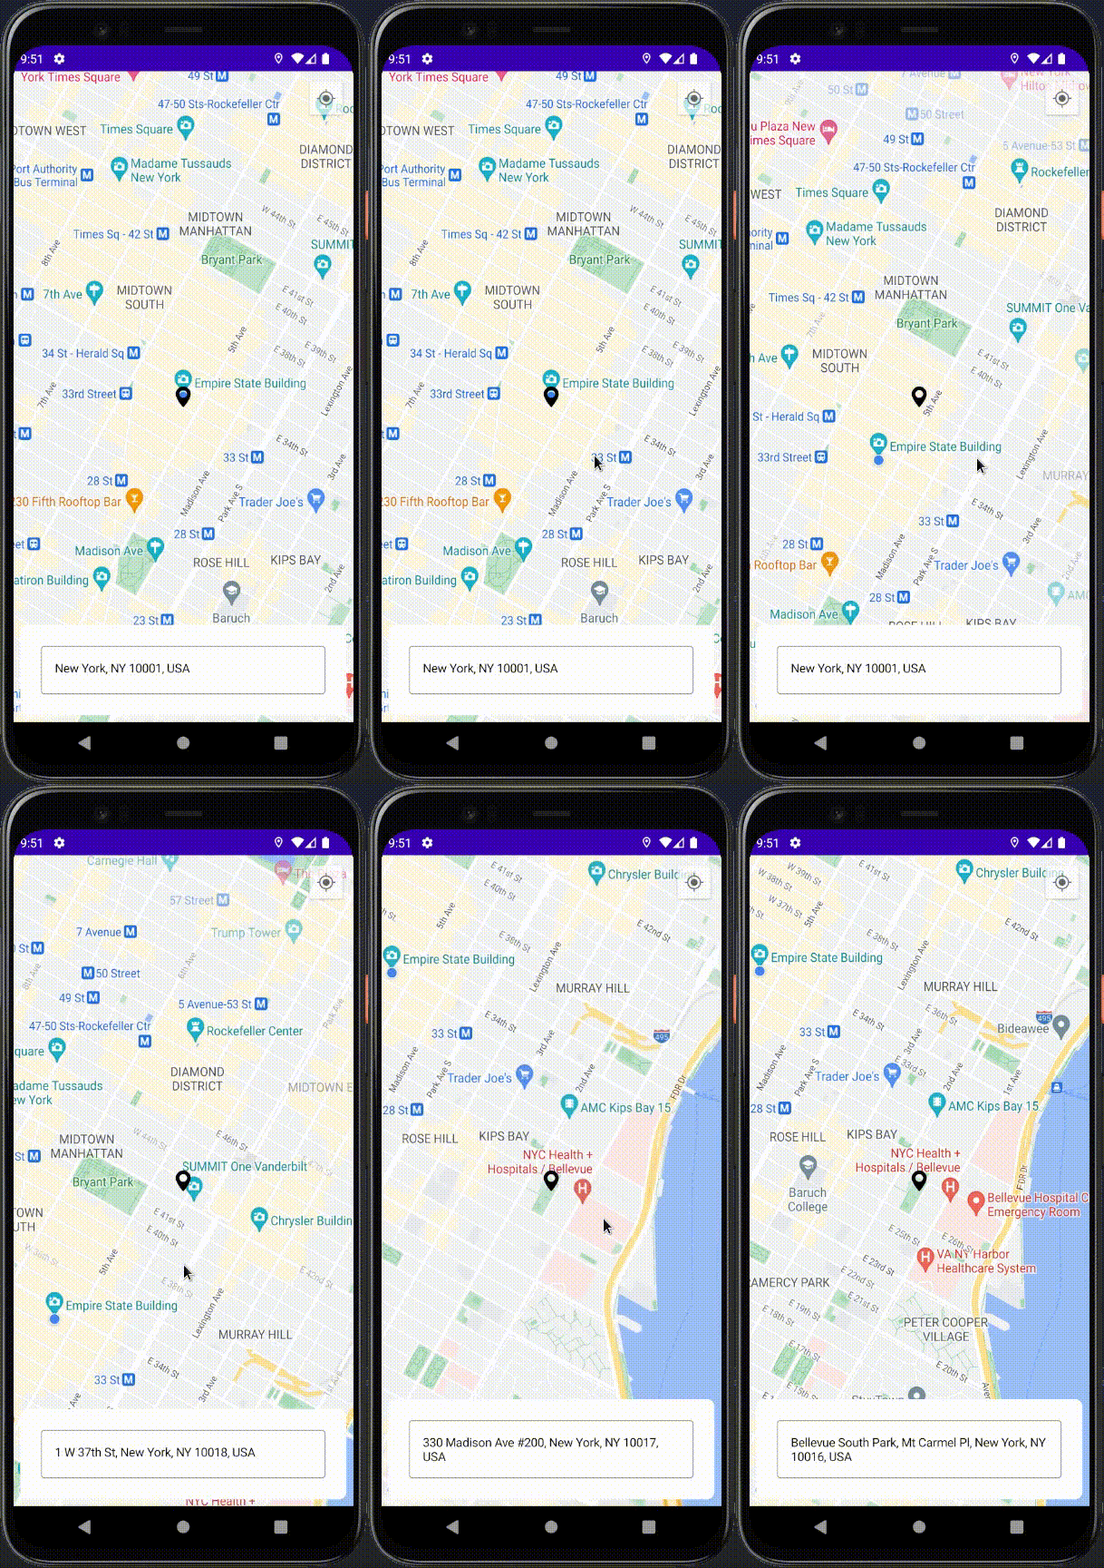
Handling this case is sufficiently trivial. First, we move the text state variable that's used by the TextField to the ViewModel. Once that's done, let's add a LaunchedEffect that'll tell us when the camera position has changed:
LaunchedEffect(cameraPositionState.isMoving) {
    if (!cameraPositionState.isMoving) {
        viewModel.getAddress(cameraPositionState.position.target)
    }
}
This effect is triggered everytime the camera settles down after moving. In our ViewModel, we simply use the Geocoding API to produce an address:
fun getAddress(latLng: LatLng) {
        viewModelScope.launch {
            val address = geoCoder.getFromLocation(latLng.latitude, latLng.longitude, 1)
            text = address?.get(0)?.getAddressLine(0).toString()
        }
    }
Since text is the state variable for the TextField, changing it results in the UI being updated as well. And with that, we've achieved all our goals.
End Result
Otherwise, see here
Final Words and Code
We have successfully built the screen as per the stated goal. There may be rough edges and bugs throughout the code, it's meant to be used as a sample of how to implement these features and integrate them with one another.
After a little bit of cleanup, the codes look like below:
I hope this article was helpful to you. Consider leaving a thumbs up if you liked it.

